 Writers are always thinking about plots and outlines. If you’re writing a book, you’re thinking about plots, subplots, plot twists, characters, motivation and heaven knows what else. If you’re writing an article, you’re thinking about the structure: introduction, main points, and conclusion.
If you’re in contact with other writers, you already know that everyone has different methods of coming up with that essential outline. Some writers can work only in a very structured way, using headers, sub-headers, explanatory paragraphs and bullet points. Others can’t conceptualise the plot or article unless they scribble ideas in clusters or bubbles, joining related ideas with connecting lines.
When it comes to brainstorming, some writers can work only with a pen and paper while others love software programs that will do it for them.
Today we’re going to look at three different ways of handling outlines:
1. A linear outline
2. Pen-and-paper scribbles
3. Computer programs
As an example I’m going to use a book that I wrote years ago for reluctant readers. It is intended for a readership of around 8 yrs, but with some reading problems. I wanted to show a few different problems: the difficulties faced by a child moving into a new neighbourhood and away from old friends; the stresses caused by wanting to be accepted by the peer group; the struggle with what’s right compared to being accepted; the consequences of going against your own principles. (All without being too heavy and moralistic!)
I’ve chosen this book to use as an example because it’s a simple plot with a few hurdles for the main character, and therefore easy to map. You could use the same process for mapping an article.
1. Linear outline (on the computer or handwritten notes)
This is simply a written outline of what goes in the story. You can be as detailed as you like, or keep it brief. For example:
Storyline for Gipps St Gang
Main character: Collie
Problem: Needs new friends in new neighborhood
Secondary Characters
- The Gang: Jack (leader)
- Collie’s parents
- Collie’s uncle
- Police officers
- The store detective
- The store manager
Hurdles faced by Collie
- Has to steal things to join gang
- Feelings of guilt after first robbery
- Guilt escalates when he is forced to steal from his uncle’s shop (2nd robbery)
- He is caught and taken in by police (3rd robbery)
Final problem: Collie is threatened by Jack – warned not to tell about the rest of the gang
Ending: Collie breaks with the gang and admits his guilt to his uncle
Character Development: Collie learns not to compromise his principles for the sake of making friends. Also learns that crime doesn’t pay!
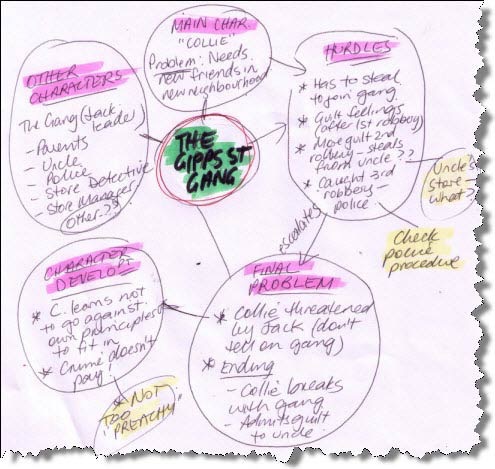
2. Cluster diagram (sometimes called a ‘bubble’ diagram, or a ‘cloud’ diagram)
Here you can see the same outline, but mapped by someone who has started by putting the name of the story in the middle, and drawn bubbles that contain clusters of related ideas.
You can do this quickly with a pen and paper, and add many more ideas if you want. Anything you don’t want, or you want to move – just cross it out or draw a connecting line to a different bubble! In this example you can see where I’ve highlighted in yellow thoughts about what I need to research or think more about.
3. Computer Programs
You can simply use a program like Microsoft Word to outline your story, using their diagrams to outline the plot, or you can use something more complex, likeFreeMind. (You can pay a lot more for a more sophisticated program like MindJet, but FreeMind will do the job just as well – and the price is right! 🙂
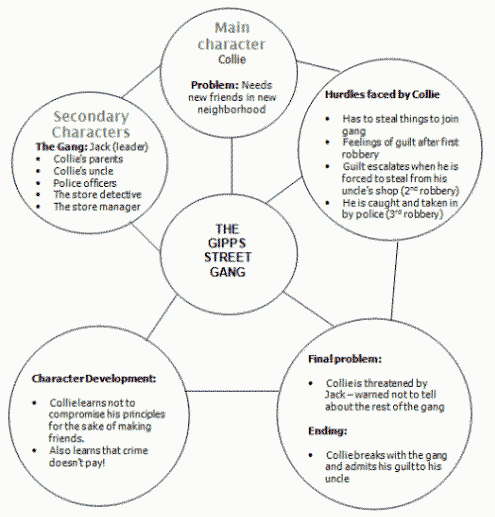
a) Using a Word Processor: Here’s an example of the same plot outlined using shapes and text boxes in Microsoft Office 2007 (I prefer using PowerPoint for quick diagrams, because it’s so easy to create something with bullet points or to move the text boxes around). You can also create snazzy-looking diagrams using SmartArt, but I’ve found that sometimes the text is too small for comfort if I use this feature.
Personally, I can’t really see the point of taking the time to draw circles and squares and text boxes – it would be quicker to type it out in bullet points and then tweak it. But if you want to do it this way, it might look something like this (basically just a tidier version of the hand-scrawled cluster):
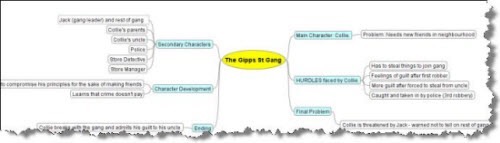
(b) Using a mind-mapping program: This example has been created with a free program called FreeMind.
In FreeMind, you start by opening the program and clicking “New”. This gives you one ‘node’ in the middle of the page. Double-click on it and you can type whatever you want into the node (I’ve typed the name of the story: “Gipps Street Gang”.
To create ‘nodes’ (or branches) that grow out of this parent node, you simply hit the ‘insert’ button on your keyboard. This pops up another linked box to type in. Each time you hit ‘enter’, another box will appear linked to the first main node. I created six main nodes: Main Character, Secondary characters, Hurdles, Final Problem, Ending, and Character Growth.
Then I wanted to expand on each of these ideas. To enter branching ideas, I clicked on the idea (or node) and hit ‘insert’. This gave me some sub-branches for each idea. Every time I wanted to enter another idea on the same level, I hit the ‘insert’ key. (This might sound complicated, but once you try it out, you’ll find it’s not. You can enter ideas very quickly, then see the relationships easily in the diagram you create.)
This is what the mind-map looked like when I’d finished entering all the related ideas:
The main mind-map – overall view:
The left-hand side of the mind-map:
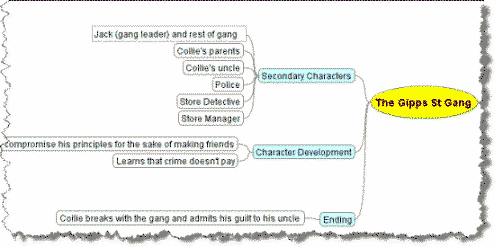
The right-hand side of the mind-map:
It will take you only a few hours to play around with FreeMind and see what it can do. You can save your diagram as a FreeMind file, or export it as an .rtf file, a .jpg or a .pdf to store in a folder or expand later. You can download versions for Windows or for a Mac.